
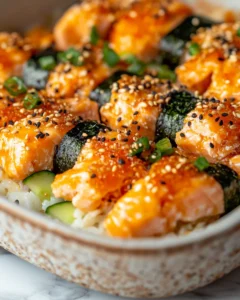
Who says sushi is only for special occasions? This Easy Salmon Sushi Bake brings all the flavors of your favorite sushi rolls into a quick, baked, family-friendly casserole that’s perfect for a weeknight win. With layers of seasoned rice, tender salmon, creamy sauce, and a crispy topping, it’s comfort food meets sushi magic—without the rolling or fancy knife skills.
Inspired by popular sushi bake trends, this recipe is designed for simplicity and flavor. It’s ideal for busy evenings when you want something fun, indulgent, and shareable. Served in a casserole dish and portioned with a spoon, it combines all the textures of sushi—savory, creamy, slightly crunchy—into a dish that’s as satisfying as it is easy to make.
Why This Sushi Bake Is Perfect for Weeknights
Traditional sushi can be time-consuming and intimidating for weeknight dinners, but this baked version is approachable and fast. It captures the essential flavors of sushi—salmon, rice, creamy sauce, and a hint of spice—without requiring precision or raw preparation.
Another reason this recipe works for weeknights is its adaptability. You can customize it with vegetables, different proteins, or seasoning levels to suit your family’s tastes. It’s also easy to assemble in advance, making it convenient for busy evenings.
Ingredients for Easy Salmon Sushi Bake
-
2 cups (360 g) sushi rice, cooked and cooled
-
1 tablespoon (15 ml) rice vinegar
-
1 teaspoon (5 g) sugar
-
1/2 teaspoon (2 g) salt
-
12 oz (340 g) salmon fillet, cooked and flaked
-
1/2 cup (120 g) mayonnaise
-
2 tablespoons (30 g) sriracha sauce (adjust to taste)
-
1 teaspoon (5 g) soy sauce
-
1/4 cup (30 g) shredded nori or seaweed strips
-
1/4 cup (40 g) diced cucumber (optional)
-
1 tablespoon (10 g) sesame seeds
-
Optional garnish: sliced green onions, avocado

Step-by-Step Instructions
Start by preheating your oven to 375°F (190°C). This moderate temperature ensures that your sushi bake will heat evenly without drying out the rice or salmon. While the oven warms, prepare a 9×9-inch (23×23 cm) baking dish by lightly greasing it with a small amount of oil or nonstick cooking spray. This step prevents the rice from sticking to the bottom and sides, making it easier to serve the final dish.
Next, prepare the sushi rice. In a small bowl, combine rice vinegar, sugar, and salt, stirring until the sugar and salt dissolve completely. This mixture is the key to achieving that classic sushi flavor: sweet, tangy, and lightly seasoned. Gently fold the vinegar mixture into the cooked sushi rice, taking care not to mash or break the grains. Use a spatula or wooden spoon to lift and fold the rice until it’s evenly seasoned. Taste a small spoonful and adjust the seasoning if needed—the rice should have a balanced flavor that complements the creamy, spicy salmon topping.
Once the rice is ready, spread it evenly into the prepared baking dish. Press it down gently with the back of a spoon or spatula to create a uniform layer. A consistent layer ensures that every bite has the same proportion of rice and toppings, and it also helps the sushi bake hold together when serving.
While the rice is setting, prepare the salmon topping. In a separate bowl, combine flaked cooked salmon, mayonnaise, sriracha, and soy sauce. Mix until the salmon is fully coated in the creamy, spicy sauce. The mayonnaise adds richness, the sriracha brings a gentle heat, and the soy sauce introduces a savory umami element that complements the rice perfectly. Spread the salmon mixture evenly over the rice, making sure it covers the surface completely. Smooth it lightly with a spatula to create an attractive, even layer.
Next, add your toppings for extra flavor and texture. Sprinkle shredded nori evenly across the salmon, then add a scattering of sesame seeds for a nutty crunch. For extra freshness and color, you can include optional diced cucumber or other vegetables like avocado. These toppings not only add visual appeal but also provide contrasting textures that make each bite more interesting and satisfying.
Place the baking dish in the preheated oven and bake for 10–12 minutes, or until the top is slightly golden and the dish is heated through. The goal is to warm the sushi bake without overcooking the rice or salmon. During baking, the sauce will meld with the salmon, creating a creamy, cohesive layer that’s easy to scoop.
Once baked, remove the dish from the oven and allow it to cool for a minute or two. This brief rest helps the sushi bake set slightly, making it easier to serve. Garnish with green onions or slices of avocado for added color, freshness, and flavor.
Serve the sushi bake warm, alongside additional nori strips or soy sauce for dipping. When plating, encourage diners to scoop a portion that includes both rice and the creamy salmon layer, ensuring each bite has a perfect balance of flavors. This dish is perfect for casual dinners, gatherings, or when you want the flavor of sushi in an easy, shareable, baked format.
For best results, use freshly cooked rice and high-quality salmon. You can also experiment with toppings such as tobiko, sliced scallions, or even pickled ginger to elevate the flavors further. The sushi bake is versatile, flavorful, and always a crowd-pleaser.

Tips for the Perfect Sushi Bake
-
Use cooked salmon for convenience—poached, baked, or pan-seared all work well.
-
Allow the rice to cool slightly before layering to prevent it from becoming mushy.
-
Adjust the amount of sriracha to control the spice level for family-friendly meals.
Serving Suggestions and Variations
This sushi bake pairs perfectly with a simple side salad or steamed vegetables. You can also serve it with pickled ginger or extra soy sauce for added flavor.
For variations, try adding avocado slices, edamame, or imitation crab for a colorful twist. You can also experiment with different proteins like shrimp or cooked tuna for a unique spin.
Frequently Asked Questions
1. Can I make this ahead of time?
Yes! This sushi bake is very convenient for preparing ahead of time, whether for a family dinner, potluck, or meal prep. You can assemble the dish a few hours—or even up to a day—in advance and store it covered in the refrigerator. Keep the rice layer, salmon topping, and any additional ingredients together in the baking dish, but do not bake it until you’re ready to serve. Baking just before serving ensures that the top remains slightly golden and crisp while the rice stays perfectly textured. If the dish sits in the fridge for a while, allow it to come to room temperature for a few minutes before baking, which helps it heat evenly.
2. Can I use frozen salmon?
Absolutely! Frozen salmon works well in this recipe, but it’s important to thaw it completely before use. You can thaw it in the refrigerator overnight or use a quick cold-water method if needed. Once thawed, cook the salmon fully and flake it before mixing it into the mayonnaise and sriracha topping. This step ensures even cooking throughout the dish and prevents excess moisture from watery salmon, which could make the rice soggy. Using fresh or thawed salmon also helps the flavors blend better, giving your sushi bake a deliciously creamy and savory consistency.
3. Can I make this gluten-free?
Yes, this sushi bake can easily be made gluten-free. The main consideration is the soy sauce, which typically contains gluten. Replace it with a certified gluten-free soy sauce or tamari for the same umami flavor. Additionally, if you’re using imitation crab, pre-made sauces, or other condiments, be sure they are labeled gluten-free. Most of the other ingredients, including rice, mayonnaise, sriracha, and sesame seeds, are naturally gluten-free. By making these simple substitutions, the sushi bake remains just as flavorful while accommodating a gluten-free diet.
4. Can I make this less spicy for kids?
Yes, this recipe is very adaptable to different spice preferences. To make a milder version, simply reduce or omit the sriracha from the mayonnaise mixture. You can also prepare the sriracha separately and let each person add it according to their taste. This way, kids or anyone who prefers a gentler flavor can enjoy the sushi bake without any heat, while adults or spice lovers can still enjoy a kick of spice on their own serving. This flexibility makes the dish perfect for family meals or gatherings with varying taste preferences.
Final Thoughts
Easy Salmon Sushi Bake is the ultimate weeknight win—quick, flavorful, and satisfying for the whole family. It delivers the fun of sushi without the stress of rolling, slicing, or raw fish prep, making it approachable and stress-free.
What makes this recipe truly special is its versatility. You can adjust the spice, add extra vegetables, or swap proteins without compromising flavor. It’s also a visually appealing dish that makes mealtime feel special even on a busy weekday.
Whether served for family dinner, casual entertaining, or a fun meal prep option, this sushi bake is a reliable crowd-pleaser. The combination of seasoned rice, creamy salmon, and crunchy toppings creates layers of flavor that satisfy every bite. Once you try it, it’s likely to become your go-to weeknight dinner recipe—a flavorful, comforting, and effortless way to bring a taste of sushi to your table anytime.
PrintEasy Salmon Sushi Bake (Weeknight Win)

A quick, flavorful, and creamy baked sushi casserole perfect for weeknight dinners.
- Prep Time: 15 minutes
- Cook Time: 12 minutes
- Total Time: 27 minutes
- Yield: 4 servings 1x
Ingredients
-
2 cups (360 g) sushi rice, cooked and cooled
-
1 tablespoon (15 ml) rice vinegar
-
1 teaspoon (5 g) sugar
-
1/2 teaspoon (2 g) salt
-
12 oz (340 g) salmon fillet, cooked and flaked
-
1/2 cup (120 g) mayonnaise
-
2 tablespoons (30 g) sriracha sauce
-
1 teaspoon (5 g) soy sauce
-
1/4 cup (30 g) shredded nori or seaweed strips
-
1/4 cup (40 g) diced cucumber (optional)
-
1 tablespoon (10 g) sesame seeds
-
Optional garnish: sliced green onions, avocado
Instructions
-
Preheat oven to 375°F (190°C) and grease a 9×9-inch dish.
-
Mix rice vinegar, sugar, and salt; fold into rice.
-
Spread rice in the dish.
-
Mix salmon with mayonnaise, sriracha, and soy sauce; spread over rice.
-
Sprinkle nori, sesame seeds, and cucumber on top.
-
Bake 10–12 minutes until heated through.
-
Garnish and serve warm.